Showing posts with label Graphics / Photos. Show all posts

Monday, July 27, 2009

A quick, free, easy, low skill way to make-over your blog, online store, ebay store, or informational website.

Give your site a mini-makeover (No Money, No HTML, 15 minutes)
When I hear the word make-over, my first guess is making over someone's appearance, more specifically, their face.

Let's consider the top of our websites as their face. Its the first thing a visitor sees, and usually appears on every page of our site. It needs a mini-makeover from time to time.

Your Site's Header
This section is usually called the header, and includes the name of the site. It might also include other information, a graphical logo, and/or other graphics.


Your site's Header might be an image file, or a simple line of text. For an eBay store, consider your store logo as your header.

Why its Smart to Makeover your website's Header
Whether your site's Header is looking stunning, or plain, or anywhere in between, its a smart idea to make some changes about once a month. Changes will show visitors that someone is actively caring for and tending to your site. It will show those who've visited in the past that there is a reason to take another look.

Take a look at Amazon.com or OldNavy.com... you'll likely notice a slight change from the last time you looked - often with no functional changes at all... just an aesthetic change.

Let's do it.
Yep, even if you paid top dollar to have a header made for you, its smart to give it a little makeover. If you have nothing but a line of text, don't worry, its easy to give that a quick make-over too.

Tools for job
I have been using XHeader to create my website headers and banners, but you can use any graphics/photo editing tool you are comfortable with that provides high resolution jpg images.

XHeader is a free download. I like that it allows me to save a working file, to go back to later to move elements around, remove elements, etc.


If your header is a line of text
Duplicate the text in your graphics program, using the same font, same color, same size, etc.

If your header is an image
Open that image in a graphics program. You may want to first crop various elements of the header and save them separately, so you'll be able to move them around in the new image. (Be smart - keep at least 2 back up copies!)

Keep in mind....
The purpose of a mini-makeover is not to CHANGE a person's appearance so much that they are unrecognizable, nor is it meant to change the way they function. So, be sure to retain aspects of your current header.

When people open your site after this makeover, you want them to instantly know that they ARE on YOUR site. Whether they type in your url, use a bookmark, or find one of your pages from a web search, you want them to know instantly they have been here before.


What to keep the same
Perhaps retain the graphic logo, the color Scheme, and/or the way your site name is written. Perhaps leave everything just as it is, and only add to it.

Give it a makeover!
Perhaps....
  • Add a stripe of color to the top, or bottom of your header (or maybe the middle)
  • Tweak the color scheme just a bit.. go a shade darker or a shade lighter in every color used.
  • Add a background color - either to blend into your sites background, or to stand out from it.
  • Add additional graphics or product images. (or remove existing ones)
  • Add quick text promoting a current or upcoming special
  • .Add information your viewers might be interested to know... Payment methods accepted, shipping charges, date your blog started, whatever.
Try getting inspiration from:
  • Upcoming holidays, upcoming change of seasons
  • Look up some more obscure holidays, or events related to your site
  • New products or new information added to your site
Want Examples?
  • Back-to-school - school bus, backpacks, pencils, create a chalkboard look, use a school approved printing font...
  • End of Summer - jewel tone colors, sunset, empty beach chairs
  • Start of fall - earth tone colors, apples, colored leaves
Some examples from my site:


Be sure to save a copy of your existing header.... perhaps 9 months from now, you'll use it again, as a ready-made mini-makeover.

Remember, keep your header recognizable. Save copies as you go along... if you decide to make a lot of changes, perhaps use some of the intermediate saved copies for a few weeks each.

Id love to see YOUR mini-makeovers! Please add a link to your site in the comment section. (and one to the before header too, if possible.

Enjoy!
Cindy
PS: Ill say it again... be smart and keep a back-up.

PPS: See more make-over blog articles today. Start with
Hopelessly Flawed's Makeover Monday built-in Desk
Monday, June 1, 2009

Use Flock to Drag and Drop Photos into EBay Listings.

Oops! Looks like I was mistaken about dragging and dropping from Photobucket, as I'm realizing this morning that I'm only able to drag in a thumbnail.

So, I am back to recommending Flock! Flock is actually a browser, designed for working with multiple social networking sites. I, myself, only use it's Media Stream applications, which is what I'm going to explain - and show you - here.

It will take some time to get the Flock Media Stream and Media bar installed and set up. But, once these one-time steps are complete, you will save time and frustration every time you want to include a photo in an ebay listing, or in a blog entry or forum post. Its smart to spend a bit of time to save MANY bits of time.

To Get & Install Flock
  • Note: You will need a photobucket account. Create one first if you do not already have one.
  • Go to http://photobucket.com/flock.
  • Click to Download Flock 2.0 (save file if asked)
  • Optional to enter email address
  • Open the saved/downloaded file.
  • Choose "Custom Installation". Uncheck the box next to "make Flock my browser"
  • Note: My Kapersky Security Software hollered about a few things during installation... I allowed it to proceed.
  • Allow the installation to add an Icon to your desktop, and/or your start menu, etc.
To Set-Up Flock
  • Open Flock (such as from the desktop icon).
  • Notice a tab is already open to Photobucket(center, about 1/3 the way down the screen). Click on that tab.
  • Log in to your Photobucket Account.
  • Find and click the Media Stream menu near the top right of the window.
  • Choose Settings.... Show Drag Icons
  • Resize the Flock window so that just the Media bar shows, and drag it to the bottom of your screen.
Using Flock to Bring Photos into Your eBay Listings.
  • Open an eBay listing in your normal browser window (FireFox, IE, whatever), and click to revise it.
  • Scroll down so you see the description box, including pictures within the description.
  • No need to click the HTML tab! Stay in the "Standard" tab.
  • Open Flock, sized so the media bar shows along the bottom of the screen.
  • If you do not see your photos, click the "Media Streams" menu... My Accounts... your account name.
  • Hover your mouse over the larger rectangle "drag button" on the photo you want to bring into your listing.
  • Click and hold and drag - into the eBay listing, and into the location where you want the photo - then let go (release the mouse button)
  • If the photo didn't go quite where you wanted it, click on it and drag it where you do want it.
  • If its larger than you'd like, hover your mouse at the corner, click when you see the arrowed line, then drag the corner until the image is the size you want.
  • Repeat as needed to add more photos.
Note: If you have photos you want to remove, just click on them, then hit the delete key on your keyboard.

Fast, and easy, and no fussing with code. Its smart to know how things work, and even smarter to use a short cut!
Cindy

Thursday, May 28, 2009

Drag and Drop Images from Photobucket into eBay Listings, and other HTML based text!

EDIT NOTE: It turns out, I was only dragging and dropping a thumbnail of the image when working directly from Photobucket... So... I'm going back to recommending Flock. Please see a new entry coming out today, June 1st.

I've been dragging and dropping images into eBay listings for many years now. Even though Im comfortable enough working with the HTML codes... I prefer not to have to. I had been using something called Flock, but recently, I'd heard dragging and dropping can now be done right from Photobucket, so I just checked it out. Super easy!

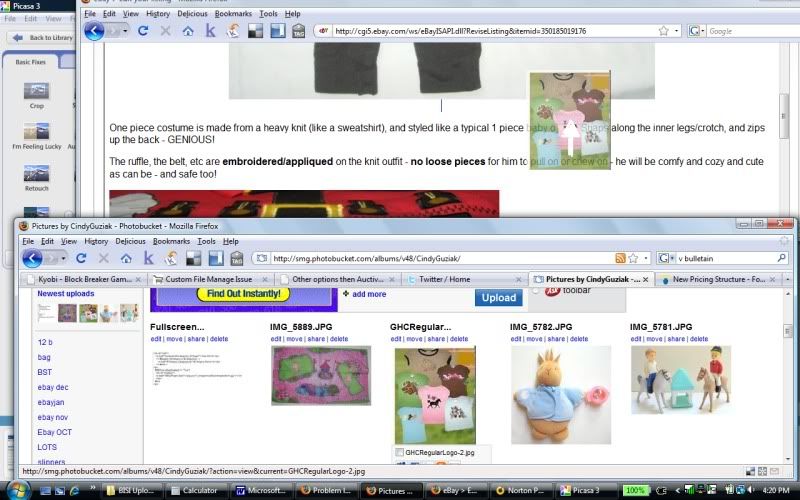
To show you, I made my eBay window short and wide across the top of my screen, with a listing open in "revise mode". The Photobucket screen at the bottom is displaying the last few photos I uploaded.

See the photo hovering in between, with the cursor over it? Thats me "dragging it"


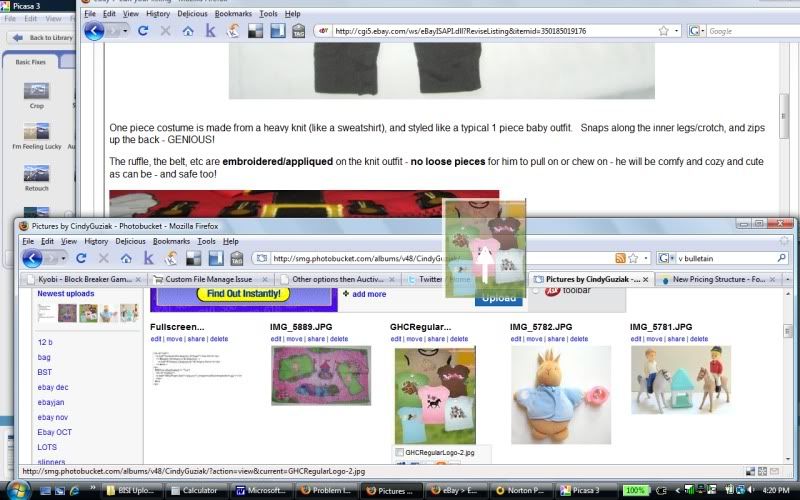
Dragging it a bit further.....


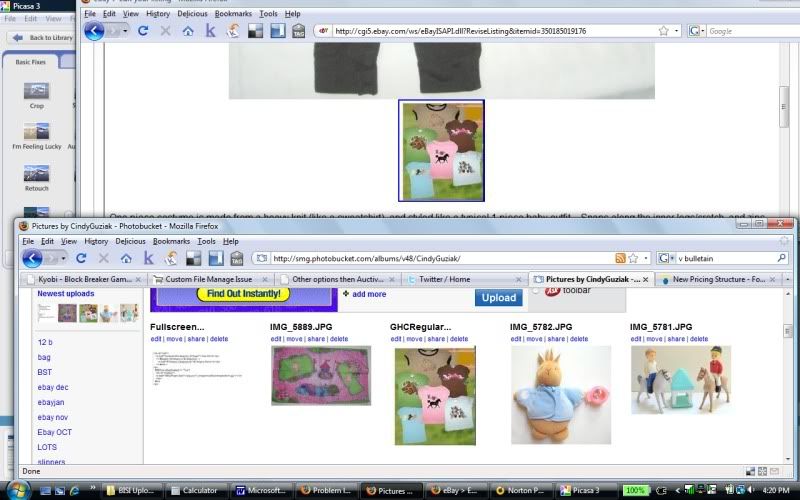
And now its in place in the eBay Listing!


In this case, I happened to use a really small photo... The size it displays as depends on the pixel size of your photo in Photobucket. THEN, you can drag on the corners of image to make it bigger or smaller. Or, click on it and drag it elsewhere in the listing.

No code to look at, or to copy and paste... no need to remember the names of the photos you want to use.... just drag and drop from one screen right to the other.

Now that's smart!
Cindy

PS. If you don't have a Photobucket account - its free and quick and easy to sign up. They offer a bulk uploader to drag and drop images from your PC, then upload them with one click to Photobucket.

Sunday, January 4, 2009

Give your website logo a mini-makeover

Whether you paid top dollar to have a logo created, or you created it yourself, you can tweek it a little now and then. Of course, remember to always keep several back up copies of the original!

Use whatever graphics/drawing program you are comfortable with, including
Paint(from the Windows Accessories folder).

My logo was created by HP LogoWorks (I got very lucky and got in on a freebie through eBay when Logoworks first got started).

I mostly use a cropped version, seperating the girl from the text, for better flexibility. Ive also cropped it to a square to use as my Avatar on Twitter, Google, and other sites - with and without the text naming my url.

Some changes Ive made to "my girl":
I first added long sleeves, to give her the layered look. This is how I most commonly use her.

I've also....left her in the short sleeves... given her a tank top (Im not thrilled with it, but its not so bad either), and dressed her up for Christmas


..............
For Valentine's Day, I contracted with Gayla from RiverTree Designs to show her dreaming of a horse on her top.

(BTW -- Great tip from Gayla: Always start from a copy of the highest resolution file you have when making new tweeks. Then resize the "new original" to suit your needs)

In all of these iterations, its still clear its the same logo, but it gives a fresh look, and also puts viewers in the seasonal frame of mind.

Remember to use your logos in your site header, in emails to customers, on your printed receipts, on your blog, wherever. Even for a small online sales business, people will begin to become familiar seeing your logo, which will lead to a sense of comfort in choosing to work with you.

I would love to see what you smarties come up with. Please post a link to your before and after logo images!

Have fun!

Cindy
PS - Be Smart - keep several back up copies!

PPS - Yes, you CAN do it, even if you can't draw well. Remember, you are not starting from scratch, you are just making some tweeks! And... most importantly, you have several saved copies of your original. If what you try doesn't work out, just ditch it and start again.

Most Windows PCs will have "Paint" in the "Accessories" folder from the start menu. Go for it!