Showing posts with label eBay. Show all posts

Saturday, November 12, 2011

Try Stamps.com -- If you ship Ebay AND Amazon orders or eCommerce Orders (Promo=3 months for 11$ Total out of pocket)

One Stamps.com account can be used for Ebay+Amazon+eCommerce Websites (such as Highwire.com).  You can bring ALL your "awaiting shipment" orders into Stamps.com to work on all of them at the same time.  Enter package weights (as needed), then hit print and walk away while all 5, 17, or 28 come out of your printer).

Benefits:
  • View all your orders on one screen. No "forgetting" about a stray Amazon or eBay order    (when desired, you can view orders from a particular source only)
  • Yes, you can print First Class Mail International, no problem.
  • Yes, you get USPS "online rates" including free Priority Delivery Confirmation, etc.
  • All addresses are checked against USPS database.  Discrepancies are displayed for your approval.  
  • +4 digits are added to all US address zip codes (this can make your package move more quickly)
  • Easy to search for previously shipped packages if/when you need to track them.
  • Request to void/refund labels for up to 2 weeks (Paypal gives you either 24 or 48 hours)
  • You can create "Pre-sets" for similar kinds of packages.    For example, create one to include "Your Amazon.com Marketplace Order" on the label of your Amazon orders.   After setting it up, just tick the boxes for the applicable orders and choose the pre-set name from a drop-down list. 
  • You can specify how you want your return address to display for each "profile" (each source of orders.. ebay, Amazon, etc)
  • Prints 2 labels per sheet.... no turning around the pages like with Paypal.
  • No ebay or Paypal ads or other ads (just very tiny and inconspicuous "stamps.com").
  • Manual entry screen --- where you can copy an address as a block, rather than field by field by field.
  • Print postage stamps for post cards, letters, etc.
  • Buy up to 250$ of postage at a time, rather than tons of small $ transactions for each label.
Go to www.stamps.com/tell and use code C-96QP-PVG.  
You'll get:
  • 4 weeks free,
  • 5$ in free postage to use during the trial
  • 10$ free postage a month for the next 2 months.
After the 4 week trial, the account costs 17.99$ a month.... but with the free postage promotion, you would actually be out of pocket 11$ to use it for 3 months.

PS.   Ill get 20$ in postage if you stay a member for at least 1 month after your trial period ends.   And so will you, if you refer people to use your code.  :)

How it works
For Ebay and Amazon
  • After downloading their software, enter your ebay and amazon IDs once.   
  • Then, each day, click Refresh and it will bring in un-shipped paid orders including item name(s).
  • For ebay listings with calculated shipping, it will bring in the weight and mail class, etc.  
  • After you print, it writes back to Amazon/ Ebay to mark the item as shipped and populates the tracking number.
For Websites
  • Export your open orders from your eCommerce Provider (this is a function available in the Orders Menu for Highwire users) and save it as an Excel file.    
  • ONE TIME in Stamps.com, create a profile for your site - which includes stating where the order export file is, and "mapping" that file to Stamps.com... which just means telling it which field means what, etc (most of it will be "auto-matched").
  • Each day thereafter, export your open orders and save with the original file name.    
  • In Stamps.com, click Refresh and all your orders will populate.
Wednesday, June 10, 2009

Auction or Fixed Price eBay Listings?

I think 30 Day Fixed Price (30dFP) is the way to go!

FP is such a GREAT DEAL, in so many ways.

For 35 cents, you have the whole month for it to sell... rather than just a week with an auction.

Up until it sells, you can change the title, change the price, whatever.... with an auction, if someone bids, you cannot make any changes... and then it could sell for that opening bid.

With 30 days, you can try out a few stratedgies, all for that same 35 cent listing fee.
You can start out with a fairly high price (maybe someone has a saved search looking for EXACTLY what you are selling)..... Then add the Best Offer option after a week, then lower the price a bit a week later, then lower some more, and take off the best offer option....

With 30 days... you can use ALL of those smart keywords you've thought of. Select some to get started... after 2 weeks or so, switch in some different ones.

When you're down to less than a week left... go to your best price... the lowest price you are HAPPY to take... the lowest price the item is WORTH.

If its still unsold with a day or two left, decide what YOU want to do. Do you want to lower the price to try to ensure the item sells? Or, do you want to take a chance and let the listing run out, to see if there will be a last day buyer? (Yes, even with Fixed Price, people DO buy at the end).

If the listing goes unsold, you've "lost" 35 cents, and likely picked up a few watchers, and more experience with the item. You could now: Relist to 30dFP right away, relist to your eBay store, if you have one, or..... let the item stay unlisted for a month or two... and relist it then for another 30 days.. once again pricing on the high side to start.... working with your title, etc.

Monday, June 1, 2009

Use Flock to Drag and Drop Photos into EBay Listings.

Oops! Looks like I was mistaken about dragging and dropping from Photobucket, as I'm realizing this morning that I'm only able to drag in a thumbnail.

So, I am back to recommending Flock! Flock is actually a browser, designed for working with multiple social networking sites. I, myself, only use it's Media Stream applications, which is what I'm going to explain - and show you - here.

It will take some time to get the Flock Media Stream and Media bar installed and set up. But, once these one-time steps are complete, you will save time and frustration every time you want to include a photo in an ebay listing, or in a blog entry or forum post. Its smart to spend a bit of time to save MANY bits of time.

To Get & Install Flock
  • Note: You will need a photobucket account. Create one first if you do not already have one.
  • Go to http://photobucket.com/flock.
  • Click to Download Flock 2.0 (save file if asked)
  • Optional to enter email address
  • Open the saved/downloaded file.
  • Choose "Custom Installation". Uncheck the box next to "make Flock my browser"
  • Note: My Kapersky Security Software hollered about a few things during installation... I allowed it to proceed.
  • Allow the installation to add an Icon to your desktop, and/or your start menu, etc.
To Set-Up Flock
  • Open Flock (such as from the desktop icon).
  • Notice a tab is already open to Photobucket(center, about 1/3 the way down the screen). Click on that tab.
  • Log in to your Photobucket Account.
  • Find and click the Media Stream menu near the top right of the window.
  • Choose Settings.... Show Drag Icons
  • Resize the Flock window so that just the Media bar shows, and drag it to the bottom of your screen.
Using Flock to Bring Photos into Your eBay Listings.
  • Open an eBay listing in your normal browser window (FireFox, IE, whatever), and click to revise it.
  • Scroll down so you see the description box, including pictures within the description.
  • No need to click the HTML tab! Stay in the "Standard" tab.
  • Open Flock, sized so the media bar shows along the bottom of the screen.
  • If you do not see your photos, click the "Media Streams" menu... My Accounts... your account name.
  • Hover your mouse over the larger rectangle "drag button" on the photo you want to bring into your listing.
  • Click and hold and drag - into the eBay listing, and into the location where you want the photo - then let go (release the mouse button)
  • If the photo didn't go quite where you wanted it, click on it and drag it where you do want it.
  • If its larger than you'd like, hover your mouse at the corner, click when you see the arrowed line, then drag the corner until the image is the size you want.
  • Repeat as needed to add more photos.
Note: If you have photos you want to remove, just click on them, then hit the delete key on your keyboard.

Fast, and easy, and no fussing with code. Its smart to know how things work, and even smarter to use a short cut!
Cindy

Thursday, May 28, 2009

Drag and Drop Images from Photobucket into eBay Listings, and other HTML based text!

EDIT NOTE: It turns out, I was only dragging and dropping a thumbnail of the image when working directly from Photobucket... So... I'm going back to recommending Flock. Please see a new entry coming out today, June 1st.

I've been dragging and dropping images into eBay listings for many years now. Even though Im comfortable enough working with the HTML codes... I prefer not to have to. I had been using something called Flock, but recently, I'd heard dragging and dropping can now be done right from Photobucket, so I just checked it out. Super easy!

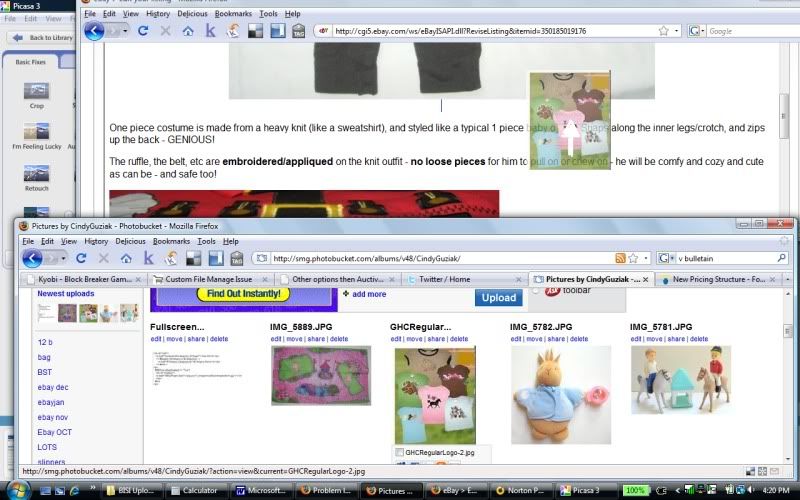
To show you, I made my eBay window short and wide across the top of my screen, with a listing open in "revise mode". The Photobucket screen at the bottom is displaying the last few photos I uploaded.

See the photo hovering in between, with the cursor over it? Thats me "dragging it"


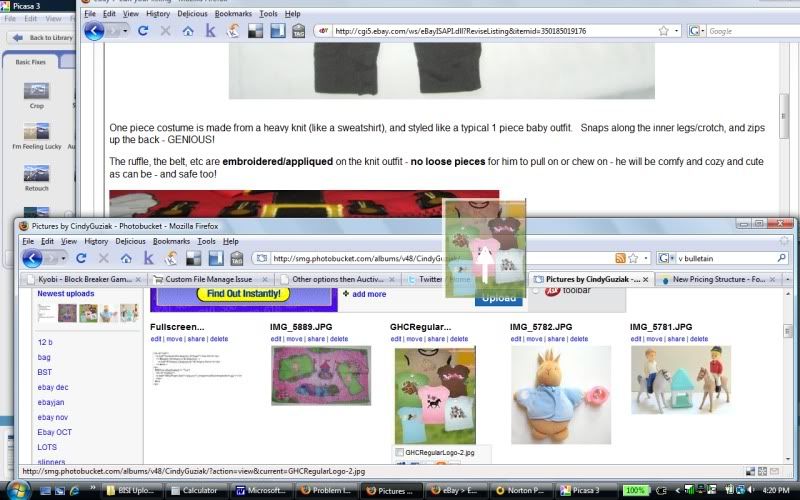
Dragging it a bit further.....


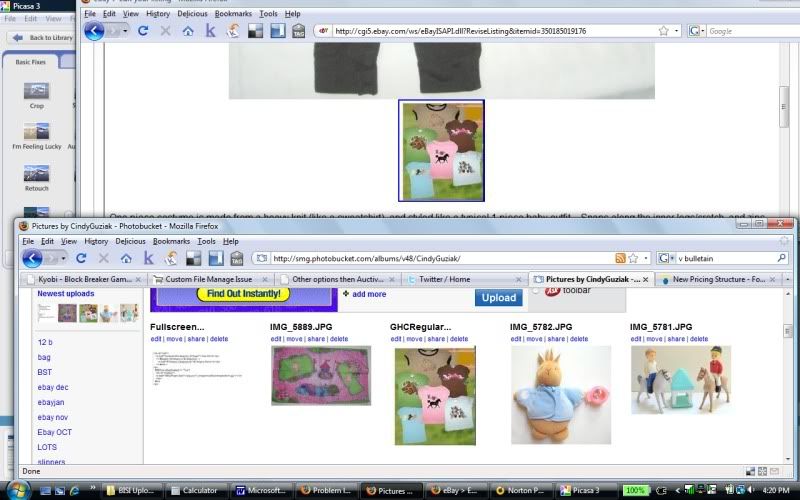
And now its in place in the eBay Listing!


In this case, I happened to use a really small photo... The size it displays as depends on the pixel size of your photo in Photobucket. THEN, you can drag on the corners of image to make it bigger or smaller. Or, click on it and drag it elsewhere in the listing.

No code to look at, or to copy and paste... no need to remember the names of the photos you want to use.... just drag and drop from one screen right to the other.

Now that's smart!
Cindy

PS. If you don't have a Photobucket account - its free and quick and easy to sign up. They offer a bulk uploader to drag and drop images from your PC, then upload them with one click to Photobucket.